TAKING
GREAT PICTURES
 |
| photo by Cathy Church from cathychurch.com |
 |
photo by David Doubilet from pinterest
|
When you look
at great pictures by legendary photographers like Jim and Cathy Church, David
Doubilet or great amateur photographers like Faithe Evans and Steve Judd you won’t notice they all have one thing in
common. For example: they all enjoy different subjects or they all frame their
pictures differently.
They do have
in common well composed photographs that center on the important subject that is
well framed and well positioned to capture the essence of the subject. So why
is it that they don’t take blurry photographs of fish butts that are so far
away that you have to squint to even see them in the picture?
 |
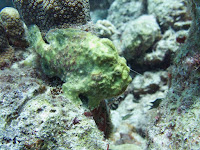
| by Faithe Evans from Facebook |
FOOLED ALL OF YOU!!!
The answer is
great buoyancy. While I will address some of these other issues in another blog,
I would like to take a stab at the most important aspect of great photography…
being in control of yourself.
Last Friday
the divers following me noticed that a school of Blue Runners got into my
shadow and followed me for a good portion of the dive as if I was a large fish
myself. I used this example as a lesson that the calmer, smoother, and more
naturally you move non-threateningly through the water the more you become a
natural part of the environment. If you are non-threatening then the sea life
will come to you instead of you chasing it.
 |
| by Steve Judd from facebook |
The amateurs
I mentioned are great examples. Steve and Faithe are capable of approaching
their subjects smoothly, naturally, and SLOWLY. They don’t hold on to rocks or
worse yet coral or a sponge to hold position. They use a skill we were all
taught in our Open Water training… Hovering.
Back to Basics
Neutral Buoyancy
Check.
If you want
to improve your photographs go back to your basics. Start with a neutral buoyancy
check. Holding a normal breath of air you should be able to completely deflate
your BCD and sink to eye level. NO HANDS
NO KICKING. Once you are in that position the surface of the water should cross
the bridge of your nose. If you continue to sink you are wearing too much
weight. If you can’t sink to eye level add a little. When you exhale you should sink.
Fin Pivots
Laying on the
bottom you should take a deep breath and continue to inhale until your torso
rises off the bottom. As soon as this starts to happen, exhale until you sink
back to the bottom again. NO HANDS NO KICKING. If you can’t get off of the
bottom drop a few pounds until you can.
Hovering
Hovering
maybe the most important of all of these skills to good photography. Start in
any position you are comfortable. Take a deep breath to rise off of the bottom
a foot or two. Then control your breathing by exhaling if you feel you are
going up and inhaling if you feel you are sinking. NO HANDS NO KICKING. As you improve at this skill practice it in
other positions until you are comfortable holding your place in any position.
Continuing Education
If you
continue to have problems managing these skills see your local dive shop and
take the PADI Peak Performance Buoyancy specialty course. This course also
covers things like. old wetsuit vs. new, 7mm full suit vs. 3mm shorty, steel
tank vs. aluminum, 80 cu. ft. vs. 63 cu. ft., and full tank vs. empty tank. Did
you know that 80 cu. ft. of air weighs about 4 lbs. Therefore, if you are down
to 750 psi. you are 3 lbs. lighter at the end of the dive than you were at the
beginning.
Another
option is to ask a dive guide or a diver you respect as having good buoyancy
control watch and advise you. I have been an instructor for 21 years and I have
yet to stop learning.
Practice
As you
continue diving if you have a few minutes on the bottom before the group gets
down or at the end of the dive when those low on air are ascending…practice. I
practice every time I am working with students and sometimes while I am leading
dives and no one even notices.
Faithe and Steve exhibit good buoyancy skills
Let me
challenge you with some goals. I only need
6 lbs. of weight to stay down with an aluminum 80 and a 3mm shorty. When I
guide I wear 12 lbs. so that I have a few extra in case someone needs it.
First, I never have to add air to my BCD to control my buoyancy. Conservatively
I suggest, if you are adding air you are at least 4 lbs. too heavy. Second, when
you have good enough control, try moving through the water by inhaling,
exhaling then changing your body position. You can actually swim without using
your hands or feet albeit slowly with this technique. When you reach this point
you too will be able to close up on the subjects you want to photograph in a
non-threatening manner and get that cover shot.
Always make
your total number of ascents equal your total number of descents.
Your really
cool blogger,
Duane


No comments:
Post a Comment